Earlier this year I bought my first smart video doorbell – the Amcrest AD110. This was my first foray into the smart doorbell scene, and I chose this model because it was subscription-free and could record via RTSP to my home NVR, as well as locally to it’s own SD card. I refuse to pay subscriptions for smart home devices – those types of devices have an expiration date of whenever the manufacturer decides to kill off that particular cloud service in the interest of whatever comes next.
The AD110 worked great and gave us a whole new level of insight into our front porch and the comfort of knowing who was at the door before answering. We loved it – a rare approval from the wife on my smart home upgrades too! But it had one major downfall – it didn’t live up to it’s advertised weather resistance. After a particularly bad rainstorm, the doorbell died. I opened it up, poured the remaining water out, and realized all the damage on the circuit boards was well beyond repair (physical burn marks where some components short-circuited).
I can do this better – I thought. Knowing what I loved, and what I hated, about the AD110, I set out to build a smarter smart doorbell. My overall spend on this project was less than the original smart doorbell cost me and set me back around CAD $130 or so total.
My Requirements:
- Must include video of the porch (live and pre-recorded)
- Must have push notifications to our phone upon doorbell ring with a way to view who is there from the video feed
- Must record historic events that happened on the porch where the doorbell was not rung (such as package delivery, someone on the porch, etc.)
- Must integrate to Home Assistant (the AD110 did not, so I couldn’t tie it into any advanced automations)
- Optional: the ability to send notifications to other smart home devices to alert us outside of the audible range of our doorbell chime – such as notifying Google Home speakers in far corners of the house or on the back deck
My Approach:
I determined the best approach was to not build an all-in-one solution. Instead, I would mount a high quality security camera off to the side of the door to start. This camera would have an RTSP feed so I can hook it into my NVR, Home Assistant, etc. This also gives me the flexibility to upgrade or change cameras as technology evolves without impacting the overall smart doorbell I would be building. Plus, this camera and it’s motion detection abilities would handle capture and notification of porch activity and motion when the doorbell doesn’t end up being rung. I also have more flexibility on where this camera points because I’m not constrained to it being inside the actual doorbell.
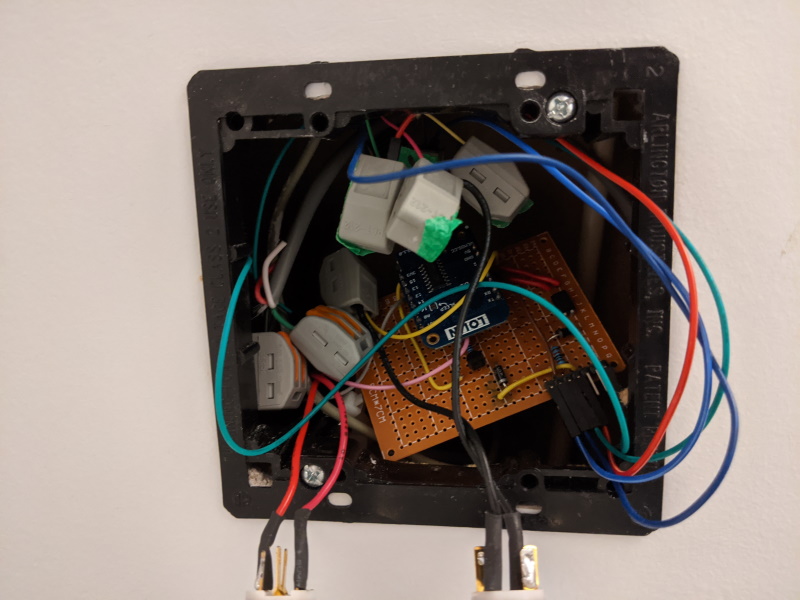
Next, I needed to tap into our existing doorbell circuitry so I could intercept doorbell rings. I needed to do this in such a way that the original doorbell chime remained functional, but that I could run a parallel circuit into a Wemos D1 Mini ESP8266 board to handle grabbing this button press and being able to automate from it within Home Assistant.
Further details on each specific component setup below.
Camera Setup:
Our garage sits beside our front porch, so from inside the garage attic I could easily feed a POE network wire out of our sofit to where I wanted the camera mounted. There was just enough separation between the sofit and brick that I could push each wire through without having to do any more intensive modifications to the sofit. A POE camera was a perfect fit here because I only had to fish a single CAT6 cable out of the area between the sofit and the brick.
Continuing on the path of remaining non-destructive, I was able to drill my camera mounting screws into the mortar between the bricks and not have to drill any brick faces. Again, this is easily patched if I ever change camera models and can’t re-use the holes (don’t damage your brick faces if you don’t have to!).
The camera angle captures my whole porch and the whole sidewalk up to the porch as well. It’s visible enough that as you approach the porch you know it’s there (visual security deterrence) but still small enough that it isn’t obnoxious or eye-catching for neighbors. I like to keep my exterior home automation projects tasteful and discreet for neighbors and not make my house look like I’m fortified or paranoid or something…
I connected the camera into my NVR software (Blue Iris), and also into Home Assistant using the Camera plugin with the RTSP stream from the camera. I believe that the Home Assistant RTSP and camera functions might be able to achieve something similar without Blue Iris in place, however, I’ve never played around with those in any depth because I already have Blue Iris and it plays a significant role in my home camera deployment – so I might as well just leverage it in Home Assistant.
Doorbell Setup:
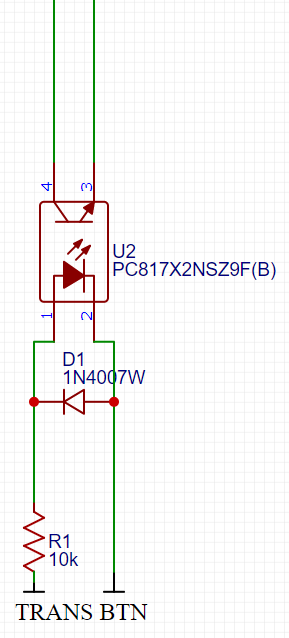
I’m pretty competent in basic electronics design, but I’m pretty lazy too. A little Google search led me to a Reddit thread [source] where someone had built a circuit almost identical to what I needed to do to intercept their own doorbell. I reworked it slightly, and below is my resulting circuit. With this across the TRANS and FRONT terminals of my existing chime, it worked perfectly.


As mentioned, I feed this circuit into a Wemos D1 Mini ESP8266 board. I like the Wemos boards because they have a lot of IO, are very small, and can be powered from a standard MicroUSB phone adapter. I actually use this same board to handle a whole bunch of other sensors and buttons too, in addition to the doorbell.
This entire circuit, Wemos included, cost me around CAD $5 or so.

The Wemos is running ESPHome – this is simply the easiest way to build powerful smart home devices that effortlessly integrate to Home Assistant and can be remotely managed should you need to push updates to your configuration out to the board. I can build using ESPHome what used to previously take me several nights to code up from hand in the Arduino IDE.
My ESPHome configuration for handling the doorbell looks like this:
esphome:
  name: esp_doorbell
  platform: ESP8266
  board: d1_mini

wifi:
  ssid: "<strong>YOURSSID</strong>"
  password: "<strong>YOURWIFIPASSWORD</strong>"

  manual_ip:
    static_ip: 192.168.1.<strong>XXX</strong>
    gateway: 192.168.1.1
    subnet: 255.255.255.0

  # Enable fallback hotspot (captive portal) in case wifi connection fails
  ap:
    ssid: "Esp Doorbell Fallback Hotspot"
    password: "<strong>YOUR FALLBACK PASSWORD</strong>"

captive_portal:

# Enable logging
logger:

# Enable Home Assistant API
api:
  password: "<strong>YOURPASSWORD</strong>"

ota:
  password: "<strong>YOURPASSWORD</strong>"

# Doorbell
binary_sensor:
  - platform: gpio
    name: "Doorbell"
    pin:
      number: D4
      mode: INPUT_PULLUP
      inverted: true
    filters:
      delayed_off: 100ms
Using the internal pullup on the Wemos allowed me to simplify my custom circuit and eliminate the need to build any sort of pullup into the circuit itself.
Home Assistant Configuration
As soon as the Wemos had a new config pushed to it, the device showed up almost instantly in Home Assistant. With both my camera and doorbell button interception now in Home Assistant, the fun can begin.
My timing on this project was great because Home Assistant had recently updated the push notification capabilities of their mobile apps and greatly expanded what they can do, and I was going to leverage that new functionality!
Here is my automation:


Let’s talk break down this action setup a little further so you can avoid the same frustrations I had.
camera.snapshot
The first part of the action will snapshot the current camera feed and save a jpg into /config/www/local/
It’s important to save into this location because for Android devices to receive a picture snapshot directly inside the notification, that picture needs to be publicly accessible. My home assistant is already accessible under a public URL on my domain name (that only I know of course!), so saving into this folder would let me access the snapshot in an unauthenticated manner.
I do have mild concerns that this image is publicly accessible if it were snooped – I’m still working out some form of cleanup routine where this image will be removed within a few seconds of the notification being sent (a simple cron script probably). Of course, it would take someone needing to know the full, direct path to find the image in the first place, but I’m security conscious and want to go the extra mile to clean it up (without breaking the actual notifications that may still be sitting on someone’s phone to be viewed). I’ll try and remember to update here when I have that figured out and in place.
notify.mobile_app
After the snapshot action, you want to place your notify action. Ordering is important because the notify action needs to call upon the snapshot taken from the first action. Use as many of these notification blocks as needed – I have two so I can notify both mine and my wife’s phones. I’m using the native Home Assistant Android app for this, but you can use just about any notification service you desire – you’ll just need to adjust the data accordingly to structure it for the service you’re using. I’ve tested it with Pushover also.
Setting the Channel to ‘doorbell’ and Importance to ‘high’ does two Android-specific things – the channel lets me customize notification settings for doorbell notifications separate from other notification types on my phone, so I can give them a unique ringtone, have them bypass DND, etc., and the importance ensures that even if my phone screen is off and the device locked, that the notification will wake my phone, vibrate it, and show itself on the screen. I don’t want to miss doorbell rings! I’m also working on expanding this notification further by putting a custom vibration pattern on it so it stands out even when the phone is on silent.
Since I was saving my snapshot in /config/www/local/, my ‘image’ tag in the notification is calling on my full Home Assistant public URL, and then adding the /local/frontdoor.jpg path to the end, which will take it straight to that snapshot image and display the image right in the push notification banner in the OS.
I also included some variables in the message title to display the time the doorbell rang at. This is particularly handy if you miss several doorbell rings because then you can associate each push notification back to a specific time and ring, which could then be used to cross-reference against recorded camera footage if you need to see the entire event that transpired.
Notifications can be built-out further to include actionable links too. I plan to eventually build a link that will playback the footage my camera recorded to the NVR at that time. Perhaps a second link could tie into my future plans for a smart door-lock so I could unlock the door if friends or family ring so they could come into our entranceway, or drop things off if we aren’t home. With Home Assistant, the sky really is the limit.
To Conclude
Skip the name brand smart doorbells if you’re someone who is savvy enough to run Home Assistant and solder some really basic electronic components together. Depending on the smart doorbell compared against, you can do this setup for about one quarter as much or less, and it leaves you with a lot of long term flexibility that you just won’t get from an all-in-one smart doorbell either. I really couldn’t be happier with this setup – my smart doorbell dying ended up being one of the best things to happen recently in my home automation adventure, it’s just unfortunate of the money loss I had to endure of the very short life it ended up having with me before dying! I’ll never need to change out the core doorbell interception circuit, and can simply upgrade the porch camera as I please as newer/cheaper/higher resolution models come to the market.
